Friday, November 27, 2009

My New Turkey Recipe

Last year was the first time I ever heard of such a thing as brined turkey. Yes, I am behind the times. Let me explain.

It has been about 12 years since I've cooked a turkey for any reason, including holidays. We have been potlucking Thanksgiving for years now, and my usual contribution has been Crown Roast of Lamb and my mom's giblet stuffing. And pies, of course.

For many different reasons we ended up celebrating Thanksgiving this year by ourselves. It was a nice change of pace - no place to rush off to, no food to try to keep warm or cook elsewhere, etc. We even stayed in our pajamas for about half the day.

Years ago, when I did attempt a turkey, it always ended up dry. This seems to be a common failing, as many of the turkeys we've eaten at various houses over the years were dry, as well. Smoking or barbecuing seems to help somewhat, but still not my favorite dish.

So, if I had my choice, I would have opted out of turkey this year, too - but Jim really wanted one. He didn't think it would seem like Thanksgiving without it.

Last year I saw Emeril demonstrate a brined turkey on Emeril Live. It sounded so interested I copied down the recipe. This was the perfect opportunity to try it out - no guests to be embarrassed if it failed (I love opportunities to experiment, and fortunately my family doesn't mind them either).

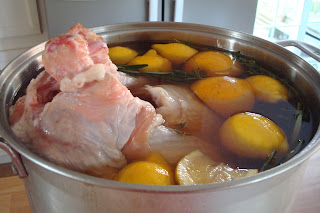
I brined the turkey for approximately 20 hours, using my large stockpot. This is what it looked like when I took it out of the fridge:


Per Emeril's recipe, I roasted it breast side down for one hour, then breast side up for 1 1/2 hours. I thought it would take much longer as this turkey was almost 13 pounds, but the thermometer was already registering 170F at 2 1/2 hours total. This is how it looked when I took it out of the oven:


I covered it with foil while I cooked the remaining dishes, which took approximately one hour. We carved it at the table, and it was still very warm. Jim remarked on how juicy it was when he carved it.

It was delicious! We all remarked that it tasted similar to those delicious rotisserie chickens from Costco that we love. It was definite the most juicy and tasty turkey I've ever had.

This recipe is definitely a keeper. I think at our next holiday potluck I'll be volunteering to bring the turkey!

Tuesday, November 10, 2009

$100 Grocery Challenge

Several ladies on the TOG Loose Threads yahoo group are working on trying to lower their food bills. We have decided to challenge ourselves to spend only $100 per week on groceries.

I used to have a much better handle on my food budget. Lately I haven't been paying much attention to the amount I spend. I believe I spend less than most, especially after conversations among this group. I think what helps is menu planning and organization. I have to admit that I have an advantage over most in that I can shop at military commissaries. Since they sell food at cost, plus 5% to cover administrative costs, all the food is generally cheaper than any grocery store.

Menu planning is a great way of keeping control over your food budget. I do it a little differently than most. I look at my calendar each pay period, see how many meals to plan, and make a list, but I do not strictly assign certain meals to certain days. I like flexibility. Most days I will not decide what to make until that morning; sometimes I don't decide until 5 pm. Of course I do make some meals that require more advance planning, and some meals I plan need to be eaten early in the pay period because certain foods go bad more quickly than others.

I also stock up on some things that I call "pantry meals." These are meals where all of the ingredients can be kept for a long period in the pantry and freezer, and can be made anytime, in case I don't plan enough meals on my menu, or something puts my plans in a fritz. These are things like chili and cornbread, spaghetti, and frozen pizza. I keep track of these items and keep them stocked and ready.

I've added back in some of the things that help keep my budget under control while menu planning. One is perusing the sales lists. I keep all the sale flyers from the local stores, so I will know about any great deals that come up. I must admit that most of the deep sales prices at regular stores still don't beat the commissary, but sometimes I'll get lucky. If you don't have the flyers handy, many stores post them online. The commissary has a list of sale items on their website. It helps reduce the budget when I can plan my meals around what's on sale.

I also get out my coupons while doing this planning. Now, I have some major cautions with coupon use - only use coupons for products you would buy already. I made this mistake as a young mom and ended up spending far more in groceries because I bought all these unnecessary items. Sometimes the coupon inserts won't have any coupons for me; other times there will be several. Another source for coupons is in the stores themselves. Have you ever seen those shelf coupons right next to the items? There is no rule that says you have to buy that item right now to use that coupon; many times that coupon has an expiration date months down the line. I'll grab several copies of these coupons for use later.

Sometimes I get very lucky and find that an item I have a coupon for is also on sale. This is a great time to stock up on nonperishable or freezable goods. I'm hoping to get a chest freezer soon to take even greater advantage of these deals.

Going back to these methods really paid off this payday. For 15 days worth of groceries I spent $186.59. I saved $8.35 in coupons. This also leaves me room later in the payday to get more milk and bananas.

This amount includes several items that I stocked up on for later, such as Cheez It crackers for $1.50/box, chicken breasts on sale for $1.19/pound, and canned chicken broth for $.50/can. This will work into greater savings down the line when I plan meals using these items that I already have.

So, will you join me in this challenge? How do you save on your grocery bill?

Tuesday, July 21, 2009

So now I know why people love them!

One of my favorite restaurants in the Eastern U.S. is Cracker Barrel. It's a great place for a homestyle, southern meal. I especially love their chicken and dumplings and their meatloaf. It is one less reason to miss Hawaii that we have them nearby us.

Several times now we have gone to the one in Williamsburg and enjoyed it so much. Unfortunately, the one in Chesapeake, so tantalizingly near our home, well - not so much.

I love the array of tempting side dishes available at this chain, and particularly the lima beans, which are usually a "vegetable of the day" selection at many of the restaurants. But, the Chesapeake one doesn't have a "vegetable of the day."

OK, so last time we were there I decided to try the fried okra. I love okra in soups and stews, and thought the fried variety would be good. What a sad disappointment. They were lukewarm, and tasted mostly of the cornmeal in the breading. I began to wonder why southerners like their fried okra and fried green tomatoes so much, because this was not appetizing.

We are currently on a road trip to New Hampshire, and stopped for dinner at the Cracker Barrel in Sturbridge, Massachusetts. I had been sitting in the car all day, and wanted to be sure to eat as many vegetables with my meal as possible. Fortunately for me they did have the "vegetable of the day," and it was my favorite lima beans. I got the platter which came with three side choices, and ended up choosing the okra again, figuring at least I would eat my lima beans and side salad and leave it at that.

The kids were curious to see and taste what okra was, and I tried to downplay it, figuring they would not enjoy it. But, I thought I should at least have a bite to show them that mommy will at least try everything, just like she expects them to.

And now I know why southerners really love these - when they are well cooked, they are delicious! They were crispy and light tasting on the outside, and hot and wonderful on the inside. They tasted very much like well-prepared fried zuchini, another favorite vegetable of mine. Between the kids and I we polished them off.

This Cracker Barrel must have an excellent cook staff, because the salad was fresh and well-prepared, the lima beans were the best yet, along with the wonderful okra. Of course, the entrees and the biscuits were great - but then every Cracker Barrel we've visited has always done these items right. It was a very memorable, homestyle meal. I wish I lived near here.

I'm now excited to find a restaurant nearby that does fried green tomatoes well. I have a feeling that, if cooked right, I will love these delicacies, as well.

Friday, July 10, 2009

Nana's New England Clam Chowder

I grew up on this stuff. I remember riding in the back of my dad's 1940s era pickup to Pismo Beach to dig for clams. I remember my mom grinding the clam meat in an old fashioned hand crank meat grinder. I remember enjoying her savory chowder on cool California nights.

When I grew up, I asked my mom where she learned to make this, and she referred me to my Nana, who lived most of her life in Cape Cod before moving her family to California. Nana gave me her recipe, which I have used and adapted over the years to make this great version that my family loves. My oldest even asks for this for her birthday meal every year.

First, I begin with salt pork. If you're not familiar with this, you can find it near the hams or the bacon. It is similar to a large hunk of bacon, but it is mostly the fat underneath the skin. In fact, usually you will find the skin still attached to one side of the chunk; simply slice it off with a sharp knife. Then, dice the salt pork and saute in your soup pan over medium high heat.

When it starts to brown, but before it gets too dark brown (because it will get hard), remove it with a slotted spoon to a paper towel lined plate. You will need these little nuggets of salty goodness later.

Next, you need to steam your clams. I highly recommend using fresh clams; the taste is so much superior to canned. You can usually find fresh ones easily if you live near the ocean, and sometimes even when you don't you can find them in a specialty seafood store. If you just can't get them, you will have to use canned, and substitute the fresh clam broth with bottled clam juice.

To steam clams, first clean them thoroughly. I start this early in the day because this process can be time consuming. First use a stiff brush to clean the shells, especially along the edges of the lips. Then, put your clams in cold, salted water (1/3 cup salt per gallon) for twenty minutes, then drain and rinse thoroughly. Repeat this rinse 1-2 times more. This gets the live clams to spit out any sand in their shells, and gets the shells clean for steaming. Be sure to use very cold water, as warm water may kill them.

I steam my clams using a steamer basket in a large pot. I also put the leafy celery tops in the steamer under the clams to add flavor to the clams and broth. Cover tightly with a clear lid, so you can see when the clams begin to open. Don't overcook them! Remove them from the steamer and set aside to cool. Reserve the broth for use in the chowder.

You can strain this broth through cheesecloth if you like, but I simply put it in a bowl and let it sit so that any sediments fall to the bottom, then use a ladle to scoop the clear broth out from the top. While this is cooling, I remove the clams from the shells, and discard any that didn't open. Once the clams are cool, mince them for adding to the chowder later.
Next, use the fat from the salt pork to cook your diced onion and celery until soft. Then, add the diced potato and saute for a bit to begin cooking them. Next, add the reserved broth, just to cover the potatoes. Add in your fresh thyme and Worsteshire sauce now, also. Cook until the potatoes are soft.

Now, I like to slightly mash the potatoes at this point. It helps make a creamier, richer chowder. I use my potato masher, but you can also press the potatoes against the sides of the pot with your wooden spoon.
Next, add your cream, but reserve one cup. To that one cup of cream, whisk in about 4 tablespoons flour. When the cream in the pot is heated through, add the remaining cream and stir until thickened. Then stir in the minced clams and season to taste with salt and pepper.


This creamy, delicious chowder is even better with a few bits of the salt pork as a garnish. Enjoy!
Nana's New England Clam Chowder
4 pounds fresh clams (cherrystone are best)
celery tops (with leaves)
1 pound salt pork, rind removed, diced
1 medium onion, diced
4 stalks celery, diced
4 medium potatoes, peeled and diced
2-3 bottles clam juice (if needed)
1 quart half and half
4 tablespoons flour
1 teaspoon thyme (fresh is best)
1/4 teaspoon cayenne
dash Worcestshire sauce

Scrub clams with stiff brush. Mix 4 quarts cold water and 1/3 cup salt. Soak clams for 15 mins, then rinse. Repeat twice. In a large saucepan put approx 1-2 inches water and celery tops. Bring to a boil. Place clams in steamer; cover tightly. Steam until open. Reserve broth. Cook pork until crisp in another large saucepan. Remove with slotted spoon onto paper towels. Remove all but 4 tbsp of grease. Saute onions and celery in grease until soft. Add potatoes, thyme, cayenne, and broth. Add juice to cover. Boil until potatoes are soft. Use a fork or potato masher to mash half the potatoes. Mix one cup of cream with flour. Add remaining cream to pot. Stir in flour mixture. Simmer until thick. Add chopped clams. Season with salt and pepper.

Aloha Hawaiian BBQ

A few months ago we were driving down Princess Anne Road and happened to notice this small Hawaiian restaurant. We decided we definitely had to try it at some point.


About a month ago I was in the same area alone and stopped in. I ordered their Kalua Pork plate lunch. What better bellweather for Hawaiian food quality than this classic dish? While it was delicious, it was not that classic, salty and smoky Hawaiian flavor I love. It was actually almost sweet, like some marinated and shredded pork rather than the traditional imu cooked version. What a disappointment.


This week, while the boys went off to do - well, whatever it is boys do, the girls asked to try this place for lunch. So, we went to give it another try. I decided to try their mixed plate, which includes teri beef, teri chicken, and kal bi.


The teri chicken was excellent, the teri beef was pretty good, but the kal bi was lacking that distinct Korean flavor like in the islands. There was fresh steamed cabbage under the beef, which I enjoyed and made me feel better about this meal having at least something green in it.


All of my kanaka friends would say that the sides really tell the quality of the overall Hawaiian experience, so I must report them here. The rice was adequate, not under or over cooked, and sticky enough. I'm not fond of mac salad, but I had to take a taste so that I can report that the pasta was overcooked and the sauce was bland.


The girls each ordered their favorite, spam musubi. They loved that it came with sauce to dip. We would expect that this sauce would be teriyaki, but it tasted very sweet, so we're not sure what it was exactly. They enjoyed it, however. I took a bite, and they were good and warm, and very large. A decent musubi.


Overall, it's pretty decent for the only Hawaiian option way over here in Virginia, so I would definitely recommend it.

Aloha Hawaiian BBQ
5260 Princess Anne Road
Virginia Beach, VA
757-499-5999
http://www.alohahawaiianbbqva.com/

Thursday, June 25, 2009

My Version of Chicken Curry

To be truthful, I had never even tried curry until moving to Hawaii. A friend, who had spent time in both India and Thailand, introduced me to this wonderful dish. She never gave me a written recipe, but I watched her make it enough times to come up with my own version. Here are some of the ingredients I use:


I begin by blanching cauliflower, then shocking it in a ice bath for later in the recipe.


Next, I quickly brown about 1 1/2 - 2 lbs. of diced chicken breast in some canola oil.


I remove the chicken to a bowl, and saute some onion, minced garlic, and a finger of peeled and minced ginger. After they soften, I add about 2 tbsp flour and saute for another 1-2 minutes.


Next, I add one can of low fat, low sodium chicken broth and let it simmer just a few minutes until the flour thickens the sauce, then I add 2-3 scoops of curry paste (can you see I don't like to measure?).


Simmer for just a few minutes, then add the vegetables, chicken and its juices, and 2 cans of coconut milk. For an extra punch, add in a few teaspoons of hot madras curry powder, or for extreme heat, some cayenne pepper.


Serve over Basmati rice - I like brown Basmati, which you can find at specialty and health food stores.


I'm sure it's not very authentic, but I really like the flavors in this dish. I don't make it often since my two youngest don't enjoy this taste, but I try to make it periodically because the rest of us just love it.
Try this dish - it's very easy!


Monday, April 13, 2009

Gingerbread House

I just came across this picture from December. The kids worked together to create this awesome gingerbread house. Isn't it great?


Tuesday, April 7, 2009

Fire Ninja Sushi and Chinese Bistro


On the recommendation of an acquaintance, I decided to give Fire Ninja a try tonight. I needed to get a quick bite to eat after choir practice, and the family was at our home fellowship group so I was able to come by and sit at the sushi bar.


This is a very nice restaurant, nicely decorated and great service. It was a Tuesday night so I was alone at the bar, and the seating area was only about 1/4 full. My server was very attentive and the food came quickly.


Understand that after almost 7 years living in Hawai'i, which is almost another Japanese home island, anything Japanese here is going to be a disappointment. First off, I did not understand the name of the restaurant; I saw nothing on the menu that would explain the Chinese Bistro. I just gave it a quick once-over, but from what I recall it all seemed to be Japanese food. It was also quite expensive. Where are the simple sushi take-out places here? I really believe a good quality, take out style sushi place would do well.

Since I was alone, and the ala carte portion of the menu was mostly large rolls, I decided to try the Sushi Dinner (10 pieces of sushi and a California roll) and the vegetable tempura appetizer. These standard Japanese dishes should give a good indication of the quality of the overall menu.

First came my hot green tea, a small cup and a whole kettle just for me. However, looking in the kettle I was disappointed to find tea bags instead of the higher quality loose tea I'm used to. It was sort of hot, but not scorching hot like it tends to be served in true Japanese restaurants. The cup was the standard small size, but inexplicably it had an American style handle. Along with my tea I was served a small dish of fresh cucumber tsukemono, a nice surprise.

Next came the salad and miso soup that came with the sushi dinner. The salad was a standard American style, with what I suppose was a Japanese style dressing, just not like anything I've ever had before. Too bad, because I love Japanese dressings. The miso was also not hot enough, and tasted like standard American miso, not high quality Japanese miso, which is what I've become accustomed to.

After that came the vegetable tempura appetizer. I was pleasantly surprised at the quantity and variety of tempura; it included sweet potato, zuchinni, eggplant, and bell pepper. Once again, standard American style tempura - not hot or crunchy enough. Also, the sauce was not quite right - almost watered down.


Finally, my Sushi Dinner arrived:


Not the most appetizing looking selection of sushi I've eaten. In fact, the ahi looked as if it had been treated for color, and the hamachi looked like it was previously frozen. Even the California roll, probably the easiest maki to make, had way too much cucumber and very little crab (imitation, of course). The tobikko looked different, so I scraped some of it off the side of the roll to taste it alone. It had none of the crunch it should have, and no flavor at all.

So, basically, I am still on the hunt for a decent sushi restaurant in the area. Any recommendations?


Tuesday, February 3, 2009

Guacamole

Growing up in central California, in a Mexican-Portuguese family, you would think that I would instinctively know how to make this. But, this was something we struggled with in my family. Our general recipe always called for lots of lemon and sour cream, and what resulted was a vaguely avocado-y dip of some sort. Not very memorable.

Years ago when we lived in San Diego I fell in love with the local version, which was just an explosion of real, creamy avocado flavor. I began watching local cooking shows, reading local recipes in the paper, and experimenting until I came up with my own version. The kicker? It's incredibly simple.

Basically, when you have good quality avocados, perfectly ripe, all that is needed is a small quantity of minced onion and salt. That's it.

It can also be enhanced with small quantities of minced tomato, onion, cilantro, and even jalapenos. But the quantity needs to be small - it's just to enhance, not overwhelm, the avocado. It has to be the star of the show.

Which is where most people go wrong - citrus. Citrus is a very strong flavor which just competes with the smooth avocado. Seriously, if you always use lemon or lime in your guacamole, try it without. You will be pleasantly surprised. The same principle applies to sour cream.

One of the biggest tricks for good guacamole is learning to recognize a ripe avocado. It should be thick skinned, preferably the Haas variety. The skin should still be mostly green - the blacker the skin, the more likely it will be overripe. It should give easily when you press your thumb into it, but not mushy.

I generally buy unripe avocados and let them sit out on the kitchen counter. Every day I check them, and when they are just beginning to ripen I put them in the fruit drawer in the fridge to slow the ripening process until I am ready to use them. You generally will have 3-4 days until they begin to go bad with this method.

I've always used the side of a spoon or a pastry cutter to mash my avocados. Most Mexican chefs will use a pestle, which is something I've always wanted. I finally splurged recently and bought my first one.


Friday, January 30, 2009

In Limbo

Sorry for the long absence. I've been having some health problems, and on top of that we're currently living in a camping trailer. Long story. Hopefully we will be in the house we bought before the middle of February. I'll have to post pictures of my new kitchen then - it's not huge I'm sure by most standards, but compared to almost all of the houses we looked at in our price range it's practically a mansion!

Cooking on a tiny propane stove with a miniscule oven is quite the adventure. I've resorted to making quite simple meals and relying on the microwave much more than I'd like. I can't wait to get in our house.

Pau!