Sunday, January 30, 2011

Pico de Gallo recipe


We recently returned from a missions trip to Mazatlan, Mexico. Love, love, love the food there! So fresh and real. Having been away from California for so long, I miss the real deal.

We were blessed to work together with some local ladies in one of the church kitchens, and they helped us make some pico de gallo, Mazatlan style. It is so simple!

Of course, we were making an insanely large amount for our mobile kitchen, so last week I experimented at home with a more manageable amount. Here is the recipe:

6 very firm but ripe plum tomatoes
1/2 yellow onion
4 serrano peppers
1/2 bunch cilantro
3 limes

Basically, you just dice the vegetables, mix, and serve, but I *did* learn some tricks to make it just right. The first trick concerns the tomatoes - there is a *right* way to dice them if you don't want a watery, mushy salsa. You must use a very, very sharp knife, and be careful while cutting not to squash the tomatoes, but you still want a very small dice. The way that works for me is to cut each tomato in half lengthwise, then lay on board cut side down. Take your sharp knife and cut into 2-3 slices by cutting parallel to the board - like you would slice a bagel. Then slice into strips lengthwise, and finally dice the strips. You may need to sharpen your knife, as this only works well with a VERY sharp knife.

Also, wash your cilantro well, but also dry very well before dicing. Water on your cilantro will mean watery sauce.

The limes should be welled rolled before cutting to release the juice, then squeezed well. A hand held juicer works best for this.

Finally, the peppers - I never did find out the name of the variety of pepper we used in Mexico. It was shaped like a large jalapeno, but it was incredibly hot - hot enough to wear gloves just to handle them. The serranos here work OK, but next time I am going to experiment with habaneros. With any pepper, be sure to mince them very, very small. It is no fun getting a big piece of hot pepper in a bite.

Anyway, this sauce should last about a week if kept in a sealed container and refrigerated. It is really, really delicious!

Sunday, May 30, 2010

Foil Packet Chicken

Now that summer is coming around again, I've been trying to plan more meals on the grill to avoid using the oven and keep the house cool. I was looking around for some more chicken recipes to add to my menu and round out the usual ribs, steaks, and other meats that we tend to grill most often. I finally remembered making packets of chicken in foil, with vegetables and sauce, that were always really good. I searched around the internet for recipes, and didn't really like any of them well enough to try, so I decided to wing it and make my own.

I laid out a large square of foil and sprayed it with cooking spray, then laid a boneless, skinless chicken breast on it. I spread the chicken breast with a crushed clove of garlic, then seasoned with salt, pepper, and Essence of Emeril. I topped the chicken with 4-5 thin slices of red onion and about 4-5 sliced mushrooms. On top of that I put about a tablespoon of butter, then about 1/4 cup of sauce.


The sauce I made with about 1/4 cup canola oil, about 1/3 cup balsamic vinegar, about 1/3 cup lemon juice, and about a teaspoon each of red pepper flakes and dried thyme. Fresh would have been better, but my thyme plant died last month.

I planned to grill the packets for about 20 minutes on a covered grill on medium heat, but a thunderstorm was coming through the area at the time, so I did end up using my oven. I cooked the packets at 400F for about 25 minutes.


They are not beautiful, but boy were they delicious! I was late getting dinner ready, so skipped making rice, but I wish I had made some to soak up all that wonderful sauce - that would have been perfect. This recipe is definitely going into my book.

Saturday, March 6, 2010

Yummy Smells


The house right now smells like warm garlicky goodness!

I'm making homemade stock from the carcasses of the two chickens I brined and roasted last week. I used a whole head of garlic, an onion, and a double handful of fresh thyme sprigs. My carcasses included lots of skin, bits of chicken, all four wings, and as much of the fatty goodness as I could save.

Tonight we will enjoy a delicious soup with chicken, noodles, zucchini, onion, celery, and carrots, along with warm buttered rolls. I'm planning to make it heavy on the garlic and spicyness, all for my poor sick hubby.

Hope you feel better soon, honey!

Sunday, January 31, 2010

Homemade Rolls

Being snowed in this weekend forced me to be resourceful for meals. Last night I made vegetable soup, using the last of the homemade chicken stock and any vegetables I had around. I didn't have any sourdough or crescent rolls, but I remembered buying a pack of three envelopes of yeast for my daughter's biology experiment last week. I always have plenty of flour on hand, so I decided to make dinner rolls.

I'm not much of a bread maker - I used to have a bread machine and used it to death before it broke. Since then I've tried to make bread now and again, with no luck. I even bought myself a Kitchenaid to make bread making easier, only to discover from bread experts that I really need a Bosch and a Nutrimill to grind my own wheat. Oh well.

I simply followed the recipe on the back of the yeast packets and made this quick rising dough.


They turned out pretty good - not as fluffy as I would like. The yeast was fine, the dough rose well, so that's not the problem. They took longer to cook than the recipe called for. Not sure what that means. Everyone liked them.

Wednesday, January 13, 2010

Albondigas

Although I grew up in California, in a Mexican family (mom's side), we didn't eat much Mexican food at home. Of course my mom's family is eighth generation Californianos, having come to California from Mexico with the first Spanish missionaries, so we have become fully Americanized over the generations. It is only as an adult that I have come to explore and understand my culture, including its food.

I actually found this recipe while searching for easy, healthy recipes in a magazine. I copied down the recipe and have used it so often that I no longer use a written recipe - its all in my head. I love the bright colors and the savory, light flavor of this soup.

Turkey Albondigas Soup

2 48-ounce containers low salt chicken broth (or equivalent homemade light stock)
1 package ground turkey (about 1-1/4 pounds)
1 egg
1/4 cup bread crumbs
1 tsp Mexican oregano
1 medium onion, diced
2-3 sliced carrots
2 cans golden hominy
1 small can tomato sauce
2 small cans diced green chilies
1 package (6 ounces) fresh baby spinach

Bring the broth to a simmer in a good-sized soup pot. Meanwhile, beat egg in a bowl, add bread crumbs, oregano, and salt and pepper to taste. Mix into ground turkey. Form into small meatballs, dropping into simmering soup as you form them. Add onion, carrots, hominy, tomato sauce, and chilies to soup and simmer for 10 minutes. Just before serving, add spinach. Let it wilt in hot soup for about 1 minute, then serve immediately. Pass around your favorite hot sauce so everyone can spice it up to their taste.

I usually serve this with hot buttered tortillas on the side.

Tuesday, January 12, 2010

Brining, Part Deux

Having had such success with my first brined turkey, I decided to try it again - with chicken!

I've really had to try to cut our food budget over the last few months. Our gas bill has been astronomical lately! Whole chickens are a frugal protein, so I decided to see if I could do as well brining these as I did with our Thanksgiving turkey. I did some research online, and then used a similar recipe as for the turkey to brine two whole roasters. Since our turkey was a bit on the salty side (although still delicious), I only brined them for 4 1/2 hours.

I then rinsed and dried them, stuffed them with onion, lemon, and fresh thyme sprigs, and brushed them with melted butter to which I added garlic, thyme, and pepper. I roasted them breast down at 450F for 15 minutes, then turned them and roasted them at 450F for another 10 minutes. I then turned down the oven to 350F and used my remote thermometer to track it to an internal temperature of 160F. I forgot to note how long this took, but it was less than one hour. I then covered the roaster with foil and let them sit while I cooked the sides.


Looks pretty good, doesn't it? I think next time I will give it more time at 450F to get a crispier skin - the breast was crispy, but in the center only. I will also brine it for just a little longer - it could have been a little saltier. Everyone loved it - we pretty much finished off one bird, and the other was stripped for stock later this week, some chicken set aside for chicken salad, and some frozen for later use.

Friday, November 27, 2009

My New Turkey Recipe

Last year was the first time I ever heard of such a thing as brined turkey. Yes, I am behind the times. Let me explain.

It has been about 12 years since I've cooked a turkey for any reason, including holidays. We have been potlucking Thanksgiving for years now, and my usual contribution has been Crown Roast of Lamb and my mom's giblet stuffing. And pies, of course.

For many different reasons we ended up celebrating Thanksgiving this year by ourselves. It was a nice change of pace - no place to rush off to, no food to try to keep warm or cook elsewhere, etc. We even stayed in our pajamas for about half the day.

Years ago, when I did attempt a turkey, it always ended up dry. This seems to be a common failing, as many of the turkeys we've eaten at various houses over the years were dry, as well. Smoking or barbecuing seems to help somewhat, but still not my favorite dish.

So, if I had my choice, I would have opted out of turkey this year, too - but Jim really wanted one. He didn't think it would seem like Thanksgiving without it.

Last year I saw Emeril demonstrate a brined turkey on Emeril Live. It sounded so interested I copied down the recipe. This was the perfect opportunity to try it out - no guests to be embarrassed if it failed (I love opportunities to experiment, and fortunately my family doesn't mind them either).

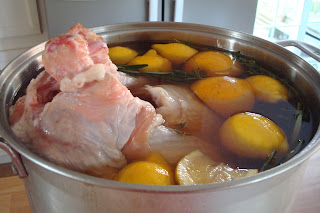
I brined the turkey for approximately 20 hours, using my large stockpot. This is what it looked like when I took it out of the fridge:


Per Emeril's recipe, I roasted it breast side down for one hour, then breast side up for 1 1/2 hours. I thought it would take much longer as this turkey was almost 13 pounds, but the thermometer was already registering 170F at 2 1/2 hours total. This is how it looked when I took it out of the oven:


I covered it with foil while I cooked the remaining dishes, which took approximately one hour. We carved it at the table, and it was still very warm. Jim remarked on how juicy it was when he carved it.

It was delicious! We all remarked that it tasted similar to those delicious rotisserie chickens from Costco that we love. It was definite the most juicy and tasty turkey I've ever had.

This recipe is definitely a keeper. I think at our next holiday potluck I'll be volunteering to bring the turkey!