Friday, June 14, 2013
Authentic Carnitas
My daughter decided, last minute, she wanted a Mexican fiesta for her graduation party. You know, to satisfy the ancestors. Sigh. I was prepared for a luau, had lots of recipes and great ideas. Now, how to feed a crowd? None of my normal recipes would be easy to prepare in large amounts, in a way to keep the table stocked and hot all day.
I decided on an authentic street taco bar - carnitas, carne asada, tortillas, rice, beans, and all the toppings. But, I have never made carnitas or carne asada before. I have made Kalua Pig in the crockpot, so I know how to cook pork until it falls apart for shredding. Now I just needed the ingredients to make it taste authentic, and a plan to give it that crispy edge when serving. This is what I came up with.
For the authentic flavor, I used the ideas for my ingredients from this recipe:
http://www.epicurious.com/recipes/food/views/Carnitas-Braised-and-Fried-Pork-364389
The crockpot is always the best way to cook meat in advance, and I knew that I could put a whole pork butt into the crock the night before and end up with meat that just falls apart the next afternoon. We can't get boneless pork butt here so it is very difficult to cut one up into pieces, and I know that the bone will pull right out when done this way.
Once the meat was done, I pulled out the bone, the bay leaves, and the orange, and kept the crockpot on warm. When I was ready to put out meat for tacos on the table, I transferred some of the shredded pork along with some of the liquid to a hot, dry pan. It only takes 2-3 minutes to give it a good, crispy charred edge.
Everyone raved about the meat, and even better, I have some left over in the freezer for another night.
Sheri's Street Taco Carnitas
1 large, 6-8 pound, whole pork butt (shoulder would also work)
1 medium onion, thinly sliced
8 garlic cloves, peeled and smashed
1 orange, cut into quarters
3 bay leaves
2 teaspoons dried Mexican oregano (I have a stash of this from Mexico - so fragrant!)
3 teaspoons freshly ground sea salt
1/4 cup lard or canola oil (I used the oil, but I will try lard next time)
1 tablespoon sweetened condensed milk
1 1/2 cups water
Put the pork, fat side up, in a large crockpot. Top with onion and garlic, pushing some down around the sides of the meat. Top with orange, bay leaves, oregano, and salt. Pour liquid ingredients over the top.
Cook roast on low for 15 hours. Remove orange, bay leaves, and bones. Can be refrigerated, frozen, or kept on warm in crockpot at this point. If setting aside for later, be sure to keep the juice with the meat.
To serve, heat a large, heavy flat pan over high heat. Cast iron would work best. Do not add oil or fat, the meat and juices contain enough to cook the meat with. Use tongs to pull meat to shreds and add to pan, just enough to cover the bottom of the pan. Add a little liquid from the crockpot, and cook 2-3 minutes, just enough to get a charred, crispy edge to the meat, while keeping the meat moist and delicious. Serve immediately with hot corn tortillas, pico de gallo, hot sauce, and your favorite condiments.
Wednesday, May 22, 2013
Potato Salad Recipe
However I loathe it. Particularly the standard, heavy-on-the-mayo, throw-in-some-pickles kind. Here and there I've had some good, non-standard varieties, but it is not something I will think of when I am making a menu.
Last week while I was planning out a grilling party with some friends, the hubs specifically asked for potato salad. I think it's been over ten years since I've made it. I don't even have a recipe. I already had two bags of tiny red potatoes that I was planning to roast, so I went to the local market. All they had were the bags of the small Dutch yellow potatoes.
I looked online for a recipe and found this one. I had all the ingredients already so I went with it. However, while I was using quite a bit of potatoes, I didn't increase the dressing recipe. I like things lightly dressed, and am watching my calories. Turns out this was the perfect amount of dressing for double the amount of potatoes. Everyone enjoyed this one, so this recipe is a keeper.
http://bobbiskozykitchen.blogspot.com/2011/09/red-skin-potato-salad.html
- 8 pieces of thick cut, chopped
- 2 tablespoons red wine vinegar
- 3/4 cup low fat or fat free mayonnaise
- 3 tablespoons whole-grain mustard
- 6 green onions, chopped in 1/4-inch segments
- 1/2 red onion, diced
- 2 tablespoons sugar
- Salt and pepper
- 2 hard boiled eggs, chopped
Tuesday, May 7, 2013
The Evolution of an Enchilada
I grew up on enchiladas. My mom made them on a regular basis. I learned how to make them at a young age. They were a staple in our household.
With our family's Mexican heritage, you would think this would be just one of many dishes passed down through the generations. Surprise - this is the only Mexican food my mom ever made. It was the only dish she remembers learning from her own mother, who was descended from the original Spanish inhabitants of California.
I'm not sure if the dish she taught me was exactly what was passed down to her. The version I learned at mom's kitchen counter was very Americanized. Ground beef, corn tortillas, enchilada sauce, cheddar cheese, and olives. In spite of that, a hit with our family. I made it for my kids quite often when they were younger. However, it's been a while.
As with most recipes I enjoy, I'm always trying to improve it. Years ago, I began swapping out chicken for the beef. When Mexican cheeses became more available, I swapped that in. I began adding green chilies to the filling for more flavor. I was beginning to make it mine.
Last week as I was making a menu plan and a shopping list, I realized Cinco de Mayo was coming up. Instead of my usual Mexican dishes (chili verde, carne asada tacos, posole, albondigas, or tortilla soup) on a whim I decided to revisit enchiladas again. It may have come back into my mind because of a treasure I snagged on my last visit to Whole Foods - Hatch brand enchilada sauce! I knew that had to be delicious.
However, on the advice of my gastroenterologist I am trying to reduce or eliminate dairy in my diet. I decided to make the chicken filling very flavorable and not have cheese inside the enchiladas, only on top. I had some leftover chicken breast from a rotisserie chicken, so I bought two large packages of thighs. I brined and grilled them - tons of flavor right off the bat! Jim helped me shred it, which was quite a chore. This could also be made with a rotisserie chicken, a whole roasted chicken, or the already cooked and cut up chicken you can buy in the package. For the amount of chicken you need, roasting or grilling your own is the way to go.
These were so delicious, we nibbled quite a bit as we shredded!
I sauteed a whole diced onion with four cloves of minced garlic and added it to the meat, along with finely minced cilantro and four cans of diced green chilies. This is what I ended up with:
OK, I know this is a lot of chicken. Way too much for two trays of enchiladas. My motto is, better too much than not enough. The extra is in the freezer for a crockpot chicken dish I make sometimes for Bible study group. There was probably way less left over than you would think - I really overstuff the tortillas, which is the way to go. I like a high ratio of stuffing.
The time consuming part, other than shredding the chicken, is assembling the enchiladas. It's also very, very messy. Don't wear nice clothing - enchilada sauce stains!
I heated my comal over high heat and enlisted my youngest to cook the tortillas. I've found this is a crucial step. My mom never did this - instead, she heated some of the enchilada sauce in a small pan, dipped the tortillas, and rolled. I don't know if she had some particularly fresh or special tortillas, but they never cracked or fell apart. If I try this with tortillas I can buy locally, disaster. The only way around this is to cook them first, then dip them in the sauce. They don't rip or disintegrate at all.
I dip the tortillas in a small pan of sauce, lay them in the dish, fill them with a generous portion of meat and two black olives, and roll them. Make sure the seam ends up down. Don't worry if filling spills out the sides. I push mine up against each other, making room for lots of enchiladas in one pan. The one at the end of the row is hardest, but you'll get it with practice. Corn tortillas are small, so I fill up the rest of the dish with enchiladas rolled the other direction. I usually end up with about 15 rolls in one casserole dish.
As a side note, I know some people use flour tortillas. I have used them in the past as well. I highly prefer the flavor and texture of corn tortillas. Flour tortillas are kind of bland and fall apart more easily when dipped in the sauce.
Next, I take the remaining sauce (one 14 ounce can) and drizzle it over the top of the dish of enchiladas, spreading it out evenly, especially around the edges. I then top with more olives and shredded Mexican cheese. Trays can be frozen or refrigerated and cooked later. Bake (thawed) at 350F for about 20-25 minutes.
Now, recipe - hmmm, that is a hard one. How do I give an exact recipe for something I've always just cooked by look and feel? For the two trays I made this time, I used one package of 30 corn tortillas, two 14 ounce cans of enchilada sauce, two cans of medium pitted black olives, four 4 ounce cans of diced green chilies, one onion, four cloves garlic, one tablespoon canola oil to sautee the onion and garlic, and one two pound package of shredded Mexican cheese blend. For the chicken, it's harder to say - about 6 ounces of rotisserie chicken breast, and two family size packages of chicken thighs, which I brined.
I think this recipe can be perfected even further. I'm thinking my next goal will be to learn to make my own enchilada sauce from scratch - won't that be fun!
Friday, March 2, 2012
Crockpot Bison Roast
I saw a bison roast like this in the oddest place - the produce section of the commissary! I just had to get one and try it out. It was a big hit!Next, I roughly chopped a whole yellow onion (I like large pieces of onion in a dish like this) and added it to the crockpot. Then, I washed and halved a small bag of baby yukon gold potatoes and added them. I seasoned the vegetables with salt and pepper and let it cook on low for 6 hours.
I removed the roast from the crockpot to a cutting board and sliced it, then stirred it back into the sauce and vegetables. I turned the crockpot to the warm setting for about 20 minutes while waiting for my guests to arrive. In the meantime I made some roasted asparagus to serve alongside.
All our guest raved about it - including the kids! In fact, they ate every last scrap of meat and I was left with some sauce and a few vegetables. Nothing for a picture even! Oh well, I will definitely make this again.
Wednesday, February 8, 2012
Sausage and Kale Soup

I had never heard of this soup before when a friend brought it to a potluck at my house. It was so delicious! I've been wanting to make it myself for almost a year. What brought it to my mind again was a post on Pinterest of in season vegetables - kale is in season now. I have never used it, don't know how to use it, and actually don't think I've ever eaten it except in that soup. So, I decided to make it tonight.
Of course, like with every recipe I get, I had to modify it somewhat. I always use turkey Italian sausage - both for the lower fat content and for the taste. I also changed how it was made, mostly so it would cook faster because I had guests coming over in about 20 minutes.
Katie's Kale Soup
1 lb Italian sausage (I like mild sausage) *I used turkey Italian sausage; one package is about 1.5 lbs
2 large russet baking potatoes , sliced in half, and then in 1/4 inch slices *I chopped mine very small so it would cook quickly
1 large onion , chopped
1/4 cup bacon bit (optional) *I did not use this
2 garlic cloves , minced
2 cups kale chopped (i always use way more)
2 (8 ounce) cans chicken broth *I used one quart low fat, low sodium chicken broth
1 quart water
1 cup heavy whipping cream
Chop or slice uncooked sausage into small pieces; brown sausage in your soup pot. (i take skin off and bake for about 30-40 mins then crumble) *I just cooked it like I usually do - removed the casing and crumbled it while cooking
Remove sausage from pot with a slotted spoon, leaving any fat in the bottom. Add chicken broth and water to pot and stir. * Because of time constraints, I added the potato and cooked it in the fat until it started to become translucent before adding broth.
Place onions, potatoes, and garlic in pot. *I wanted the potatoes to cook quickly so I only added the potatoes and garlic at this point, and kept it boiling on high until the potatoes were just soft, and mashed them at this point. Then I added the onions and water.
Cook on medium heat until potatoes are done. (slightly mash some of potatoes it will make soup thicker)
Add sausage and bacon. *I didn't use bacon.
Salt and pepper to taste. *I don't ever season soup until the end - sausage is salty!
Simmer for another 10 minutes. *More like 5 minutes here.
Turn to low heat.
Add kale and cream. Heat through.
I adore this soup - it is delicious! And with the reduced fat from the broth and the sausage, and the reduced sodium in the sauce, this is a basically healthy soup. Serve with some Italian bread on the side and it's a great cold weather meal!
Tuesday, January 24, 2012
Great New Cauliflower Recipe

I've been trying to eat more locally, and also eat fruits and vegetables that are in season, so I bought cauliflower to go with our meal tonight. Didn't want just boring steamed preparation, so I looked online and found an interesting recipe. Turns out to be delicious!
You can find the recipe here:
http://simplyrecipes.com/recipes/roasted_cauliflower/
Sunday, February 6, 2011
Linguica
I grew up on this sausage. It's a Portuguese smoked sausage with a garlicky flavor and a rough texture. I can't remember the brand we used then, but I'm pretty sure it was a regional specialty company brand. I grew up on the Central Coast of California, which is home to a highly concentrated Azorean Portuguese population, of which I am a member, 100% on my father's side and 25% on my mom's.
When I married my Navy man and moved away from California, this is something I definitely missed on the East Coast. The only concentration of Azoreans in the East is in Massachusetts, about eight hours north from where we were. Then we spent a few years in San Diego, where if there is any available, it was too difficult to find. But then we spent seven years in beautiful Hawaii, with a large Azorean population from way back, where linguica is widely available as Portuguese sausage. It is even sold at McDonald's!
Two years ago we moved back to the East Coast and again are missing our special sausage. My sister brought some when she came for Jim's retirement and we DEVOURED it. My kids have been asking for it ever since, and I've even been scouring the internet for online ordering sources. Then, by a fluke, I was looking in the sausage section at Harris Teeter's for something completely different, when I spotted a package of Gaspar's Portuguese Linguica. We were practically dancing in the aisle for joy!
Tonight we had linguica sandwiches - on rolls with sauteed peppers and onions and spicy mustard. Yummm! I can't wait to have it in the traditional ways - grilled and sliced at almost every barbecue as a appetizer, added to scrambled eggs, and in caldo verde or Portuguese bean soup.
Sunday, January 30, 2011
Homemade Corn Tortillas

It's been a long, long time since I had those incredible, hot, freshly made corn tortillas that I remember from authentic cooks, like our childhood family friend, Trudy. It took this recent trip to Mazatlan to reawaken my love for them. We had them everywhere, with everything, and they were truly amazing!

This wonderful lady even taught Richard and I how easy they are to make - even in her makeshift, outdoor kitchen in the Universo Colonia. So simple, that I purchased the equipment while there, and made them for my family already. These are going to become a staple around here!
First, I needed to find a local Tienda (Mexican market) to find a specific kind of corn flour, called Manseca. I was told this is the kind to use to get the best tortillas. The package has the recipe in both English and Spanish - basically, just the flour, water, and maybe a little salt. You work it into a dough with your hands to get the right consistency - it should be pliable like playdough, but not sticky. If your first few tortillas rip, they are too dry - if they stick, they are too wet. Add water or more Manseca to get it just right. Roll into golf ball size balls of dough - to get just the right size, use the recommended number of balls in the recipe. Dough dries out quickly, so keep it covered with a moist towel or plastic.
Next step is the press. Certainly you can roll out your dough, or pat it out by hand, but the press is so consistent and quick, it is well worth the money. Mine cost about $165 pesos in Mazatlan - about $16. You want to have two pieces of a thick plastic, a ziploc type bag is better than plastic wrap for this. Put the first piece of plastic on the press, top with a ball of dough, then the second piece of plastic. Press well - you want it pretty thin, not as thin as a flour tortilla, but close.
They need to be cooked immediately on a hot surface - a stainless steel or cast iron comal is best, but a griddle would work also. Peel off the top layer of plastic, and pick up with the bottom piece. Invert onto your clean hand, peel off the plastic, and slap onto the hot comal. Cook about 30-45 seconds, then flip. If you are brave you can use your hands, but if not, use a steel spatula.If you are going to use immediately, keep warm by wrapping in a moist towel or placing in a tortilla saver (I got a fantastic foam lined one in Mazatlan that I love). If not, let them cool before wrapping in plastic and refrigerating. Reheat on a comal or in a microwave.
Once you see how simple it is, and how superior handmade tortillas are to store bought, I think you will find yourself making them, too!
Pico de Gallo recipe

We recently returned from a missions trip to Mazatlan, Mexico. Love, love, love the food there! So fresh and real. Having been away from California for so long, I miss the real deal.
We were blessed to work together with some local ladies in one of the church kitchens, and they helped us make some pico de gallo, Mazatlan style. It is so simple!
Of course, we were making an insanely large amount for our mobile kitchen, so last week I experimented at home with a more manageable amount. Here is the recipe:
6 very firm but ripe plum tomatoes
1/2 yellow onion
4 serrano peppers
1/2 bunch cilantro
3 limes
Basically, you just dice the vegetables, mix, and serve, but I *did* learn some tricks to make it just right. The first trick concerns the tomatoes - there is a *right* way to dice them if you don't want a watery, mushy salsa. You must use a very, very sharp knife, and be careful while cutting not to squash the tomatoes, but you still want a very small dice. The way that works for me is to cut each tomato in half lengthwise, then lay on board cut side down. Take your sharp knife and cut into 2-3 slices by cutting parallel to the board - like you would slice a bagel. Then slice into strips lengthwise, and finally dice the strips. You may need to sharpen your knife, as this only works well with a VERY sharp knife.
Also, wash your cilantro well, but also dry very well before dicing. Water on your cilantro will mean watery sauce.
The limes should be welled rolled before cutting to release the juice, then squeezed well. A hand held juicer works best for this.
Finally, the peppers - I never did find out the name of the variety of pepper we used in Mexico. It was shaped like a large jalapeno, but it was incredibly hot - hot enough to wear gloves just to handle them. The serranos here work OK, but next time I am going to experiment with habaneros. With any pepper, be sure to mince them very, very small. It is no fun getting a big piece of hot pepper in a bite.
Anyway, this sauce should last about a week if kept in a sealed container and refrigerated. It is really, really delicious!
Sunday, May 30, 2010
Foil Packet Chicken
I laid out a large square of foil and sprayed it with cooking spray, then laid a boneless, skinless chicken breast on it. I spread the chicken breast with a crushed clove of garlic, then seasoned with salt, pepper, and Essence of Emeril. I topped the chicken with 4-5 thin slices of red onion and about 4-5 sliced mushrooms. On top of that I put about a tablespoon of butter, then about 1/4 cup of sauce.
The sauce I made with about 1/4 cup canola oil, about 1/3 cup balsamic vinegar, about 1/3 cup lemon juice, and about a teaspoon each of red pepper flakes and dried thyme. Fresh would have been better, but my thyme plant died last month.
I planned to grill the packets for about 20 minutes on a covered grill on medium heat, but a thunderstorm was coming through the area at the time, so I did end up using my oven. I cooked the packets at 400F for about 25 minutes.
Saturday, March 6, 2010
Yummy Smells
The house right now smells like warm garlicky goodness!
I'm making homemade stock from the carcasses of the two chickens I brined and roasted last week. I used a whole head of garlic, an onion, and a double handful of fresh thyme sprigs. My carcasses included lots of skin, bits of chicken, all four wings, and as much of the fatty goodness as I could save.
Tonight we will enjoy a delicious soup with chicken, noodles, zucchini, onion, celery, and carrots, along with warm buttered rolls. I'm planning to make it heavy on the garlic and spicyness, all for my poor sick hubby.
Hope you feel better soon, honey!
Sunday, January 31, 2010
Homemade Rolls
I'm not much of a bread maker - I used to have a bread machine and used it to death before it broke. Since then I've tried to make bread now and again, with no luck. I even bought myself a Kitchenaid to make bread making easier, only to discover from bread experts that I really need a Bosch and a Nutrimill to grind my own wheat. Oh well.
I simply followed the recipe on the back of the yeast packets and made this quick rising dough.
They turned out pretty good - not as fluffy as I would like. The yeast was fine, the dough rose well, so that's not the problem. They took longer to cook than the recipe called for. Not sure what that means. Everyone liked them.
Wednesday, January 13, 2010
Albondigas
I actually found this recipe while searching for easy, healthy recipes in a magazine. I copied down the recipe and have used it so often that I no longer use a written recipe - its all in my head. I love the bright colors and the savory, light flavor of this soup.
Turkey Albondigas Soup
2 48-ounce containers low salt chicken broth (or equivalent homemade light stock)
1 package ground turkey (about 1-1/4 pounds)
1 egg
1/4 cup bread crumbs
1 tsp Mexican oregano
1 medium onion, diced
2-3 sliced carrots
2 cans golden hominy
1 small can tomato sauce
2 small cans diced green chilies
1 package (6 ounces) fresh baby spinach
Bring the broth to a simmer in a good-sized soup pot. Meanwhile, beat egg in a bowl, add bread crumbs, oregano, and salt and pepper to taste. Mix into ground turkey. Form into small meatballs, dropping into simmering soup as you form them. Add onion, carrots, hominy, tomato sauce, and chilies to soup and simmer for 10 minutes. Just before serving, add spinach. Let it wilt in hot soup for about 1 minute, then serve immediately. Pass around your favorite hot sauce so everyone can spice it up to their taste.
I usually serve this with hot buttered tortillas on the side.
Tuesday, January 12, 2010
Brining, Part Deux
I then rinsed and dried them, stuffed them with onion, lemon, and fresh thyme sprigs, and brushed them with melted butter to which I added garlic, thyme, and pepper. I roasted them breast down at 450F for 15 minutes, then turned them and roasted them at 450F for another 10 minutes. I then turned down the oven to 350F and used my remote thermometer to track it to an internal temperature of 160F. I forgot to note how long this took, but it was less than one hour. I then covered the roaster with foil and let them sit while I cooked the sides.
Friday, November 27, 2009
My New Turkey Recipe
It has been about 12 years since I've cooked a turkey for any reason, including holidays. We have been potlucking Thanksgiving for years now, and my usual contribution has been Crown Roast of Lamb and my mom's giblet stuffing. And pies, of course.
For many different reasons we ended up celebrating Thanksgiving this year by ourselves. It was a nice change of pace - no place to rush off to, no food to try to keep warm or cook elsewhere, etc. We even stayed in our pajamas for about half the day.
Years ago, when I did attempt a turkey, it always ended up dry. This seems to be a common failing, as many of the turkeys we've eaten at various houses over the years were dry, as well. Smoking or barbecuing seems to help somewhat, but still not my favorite dish.
So, if I had my choice, I would have opted out of turkey this year, too - but Jim really wanted one. He didn't think it would seem like Thanksgiving without it.
Last year I saw Emeril demonstrate a brined turkey on Emeril Live. It sounded so interested I copied down the recipe. This was the perfect opportunity to try it out - no guests to be embarrassed if it failed (I love opportunities to experiment, and fortunately my family doesn't mind them either).
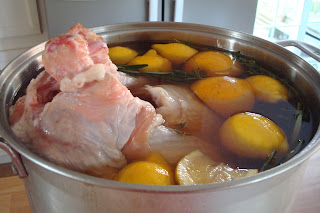
I brined the turkey for approximately 20 hours, using my large stockpot. This is what it looked like when I took it out of the fridge:
Per Emeril's recipe, I roasted it breast side down for one hour, then breast side up for 1 1/2 hours. I thought it would take much longer as this turkey was almost 13 pounds, but the thermometer was already registering 170F at 2 1/2 hours total. This is how it looked when I took it out of the oven:
I covered it with foil while I cooked the remaining dishes, which took approximately one hour. We carved it at the table, and it was still very warm. Jim remarked on how juicy it was when he carved it.
It was delicious! We all remarked that it tasted similar to those delicious rotisserie chickens from Costco that we love. It was definite the most juicy and tasty turkey I've ever had.
This recipe is definitely a keeper. I think at our next holiday potluck I'll be volunteering to bring the turkey!
Tuesday, November 10, 2009
$100 Grocery Challenge
I used to have a much better handle on my food budget. Lately I haven't been paying much attention to the amount I spend. I believe I spend less than most, especially after conversations among this group. I think what helps is menu planning and organization. I have to admit that I have an advantage over most in that I can shop at military commissaries. Since they sell food at cost, plus 5% to cover administrative costs, all the food is generally cheaper than any grocery store.
Menu planning is a great way of keeping control over your food budget. I do it a little differently than most. I look at my calendar each pay period, see how many meals to plan, and make a list, but I do not strictly assign certain meals to certain days. I like flexibility. Most days I will not decide what to make until that morning; sometimes I don't decide until 5 pm. Of course I do make some meals that require more advance planning, and some meals I plan need to be eaten early in the pay period because certain foods go bad more quickly than others.
I also stock up on some things that I call "pantry meals." These are meals where all of the ingredients can be kept for a long period in the pantry and freezer, and can be made anytime, in case I don't plan enough meals on my menu, or something puts my plans in a fritz. These are things like chili and cornbread, spaghetti, and frozen pizza. I keep track of these items and keep them stocked and ready.
I've added back in some of the things that help keep my budget under control while menu planning. One is perusing the sales lists. I keep all the sale flyers from the local stores, so I will know about any great deals that come up. I must admit that most of the deep sales prices at regular stores still don't beat the commissary, but sometimes I'll get lucky. If you don't have the flyers handy, many stores post them online. The commissary has a list of sale items on their website. It helps reduce the budget when I can plan my meals around what's on sale.
I also get out my coupons while doing this planning. Now, I have some major cautions with coupon use - only use coupons for products you would buy already. I made this mistake as a young mom and ended up spending far more in groceries because I bought all these unnecessary items. Sometimes the coupon inserts won't have any coupons for me; other times there will be several. Another source for coupons is in the stores themselves. Have you ever seen those shelf coupons right next to the items? There is no rule that says you have to buy that item right now to use that coupon; many times that coupon has an expiration date months down the line. I'll grab several copies of these coupons for use later.
Sometimes I get very lucky and find that an item I have a coupon for is also on sale. This is a great time to stock up on nonperishable or freezable goods. I'm hoping to get a chest freezer soon to take even greater advantage of these deals.
Going back to these methods really paid off this payday. For 15 days worth of groceries I spent $186.59. I saved $8.35 in coupons. This also leaves me room later in the payday to get more milk and bananas.
This amount includes several items that I stocked up on for later, such as Cheez It crackers for $1.50/box, chicken breasts on sale for $1.19/pound, and canned chicken broth for $.50/can. This will work into greater savings down the line when I plan meals using these items that I already have.
So, will you join me in this challenge? How do you save on your grocery bill?
Tuesday, July 21, 2009
So now I know why people love them!
Several times now we have gone to the one in Williamsburg and enjoyed it so much. Unfortunately, the one in Chesapeake, so tantalizingly near our home, well - not so much.
I love the array of tempting side dishes available at this chain, and particularly the lima beans, which are usually a "vegetable of the day" selection at many of the restaurants. But, the Chesapeake one doesn't have a "vegetable of the day."
OK, so last time we were there I decided to try the fried okra. I love okra in soups and stews, and thought the fried variety would be good. What a sad disappointment. They were lukewarm, and tasted mostly of the cornmeal in the breading. I began to wonder why southerners like their fried okra and fried green tomatoes so much, because this was not appetizing.
We are currently on a road trip to New Hampshire, and stopped for dinner at the Cracker Barrel in Sturbridge, Massachusetts. I had been sitting in the car all day, and wanted to be sure to eat as many vegetables with my meal as possible. Fortunately for me they did have the "vegetable of the day," and it was my favorite lima beans. I got the platter which came with three side choices, and ended up choosing the okra again, figuring at least I would eat my lima beans and side salad and leave it at that.
The kids were curious to see and taste what okra was, and I tried to downplay it, figuring they would not enjoy it. But, I thought I should at least have a bite to show them that mommy will at least try everything, just like she expects them to.
And now I know why southerners really love these - when they are well cooked, they are delicious! They were crispy and light tasting on the outside, and hot and wonderful on the inside. They tasted very much like well-prepared fried zuchini, another favorite vegetable of mine. Between the kids and I we polished them off.
This Cracker Barrel must have an excellent cook staff, because the salad was fresh and well-prepared, the lima beans were the best yet, along with the wonderful okra. Of course, the entrees and the biscuits were great - but then every Cracker Barrel we've visited has always done these items right. It was a very memorable, homestyle meal. I wish I lived near here.
I'm now excited to find a restaurant nearby that does fried green tomatoes well. I have a feeling that, if cooked right, I will love these delicacies, as well.
Friday, July 10, 2009
Nana's New England Clam Chowder
When I grew up, I asked my mom where she learned to make this, and she referred me to my Nana, who lived most of her life in Cape Cod before moving her family to California. Nana gave me her recipe, which I have used and adapted over the years to make this great version that my family loves. My oldest even asks for this for her birthday meal every year.
First, I begin with salt pork. If you're not familiar with this, you can find it near the hams or the bacon. It is similar to a large hunk of bacon, but it is mostly the fat underneath the skin. In fact, usually you will find the skin still attached to one side of the chunk; simply slice it off with a sharp knife. Then, dice the salt pork and saute in your soup pan over medium high heat.
Next, you need to steam your clams. I highly recommend using fresh clams; the taste is so much superior to canned. You can usually find fresh ones easily if you live near the ocean, and sometimes even when you don't you can find them in a specialty seafood store. If you just can't get them, you will have to use canned, and substitute the fresh clam broth with bottled clam juice.
To steam clams, first clean them thoroughly. I start this early in the day because this process can be time consuming. First use a stiff brush to clean the shells, especially along the edges of the lips. Then, put your clams in cold, salted water (1/3 cup salt per gallon) for twenty minutes, then drain and rinse thoroughly. Repeat this rinse 1-2 times more. This gets the live clams to spit out any sand in their shells, and gets the shells clean for steaming. Be sure to use very cold water, as warm water may kill them.
I steam my clams using a steamer basket in a large pot. I also put the leafy celery tops in the steamer under the clams to add flavor to the clams and broth. Cover tightly with a clear lid, so you can see when the clams begin to open. Don't overcook them! Remove them from the steamer and set aside to cool. Reserve the broth for use in the chowder.
celery tops (with leaves)
Scrub clams with stiff brush. Mix 4 quarts cold water and 1/3 cup salt. Soak clams for 15 mins, then rinse. Repeat twice. In a large saucepan put approx 1-2 inches water and celery tops. Bring to a boil. Place clams in steamer; cover tightly. Steam until open. Reserve broth. Cook pork until crisp in another large saucepan. Remove with slotted spoon onto paper towels. Remove all but 4 tbsp of grease. Saute onions and celery in grease until soft. Add potatoes, thyme, cayenne, and broth. Add juice to cover. Boil until potatoes are soft. Use a fork or potato masher to mash half the potatoes. Mix one cup of cream with flour. Add remaining cream to pot. Stir in flour mixture. Simmer until thick. Add chopped clams. Season with salt and pepper.
Aloha Hawaiian BBQ
About a month ago I was in the same area alone and stopped in. I ordered their Kalua Pork plate lunch. What better bellweather for Hawaiian food quality than this classic dish? While it was delicious, it was not that classic, salty and smoky Hawaiian flavor I love. It was actually almost sweet, like some marinated and shredded pork rather than the traditional imu cooked version. What a disappointment.
This week, while the boys went off to do - well, whatever it is boys do, the girls asked to try this place for lunch. So, we went to give it another try. I decided to try their mixed plate, which includes teri beef, teri chicken, and kal bi.
The teri chicken was excellent, the teri beef was pretty good, but the kal bi was lacking that distinct Korean flavor like in the islands. There was fresh steamed cabbage under the beef, which I enjoyed and made me feel better about this meal having at least something green in it.
All of my kanaka friends would say that the sides really tell the quality of the overall Hawaiian experience, so I must report them here. The rice was adequate, not under or over cooked, and sticky enough. I'm not fond of mac salad, but I had to take a taste so that I can report that the pasta was overcooked and the sauce was bland.
The girls each ordered their favorite, spam musubi. They loved that it came with sauce to dip. We would expect that this sauce would be teriyaki, but it tasted very sweet, so we're not sure what it was exactly. They enjoyed it, however. I took a bite, and they were good and warm, and very large. A decent musubi.

Overall, it's pretty decent for the only Hawaiian option way over here in Virginia, so I would definitely recommend it.
Aloha Hawaiian BBQ
5260 Princess Anne Road
Virginia Beach, VA
757-499-5999
http://www.alohahawaiianbbqva.com/
Thursday, June 25, 2009
My Version of Chicken Curry
I begin by blanching cauliflower, then shocking it in a ice bath for later in the recipe.
Next, I quickly brown about 1 1/2 - 2 lbs. of diced chicken breast in some canola oil.
I remove the chicken to a bowl, and saute some onion, minced garlic, and a finger of peeled and minced ginger. After they soften, I add about 2 tbsp flour and saute for another 1-2 minutes.
Next, I add one can of low fat, low sodium chicken broth and let it simmer just a few minutes until the flour thickens the sauce, then I add 2-3 scoops of curry paste (can you see I don't like to measure?).
Simmer for just a few minutes, then add the vegetables, chicken and its juices, and 2 cans of coconut milk. For an extra punch, add in a few teaspoons of hot madras curry powder, or for extreme heat, some cayenne pepper.
Serve over Basmati rice - I like brown Basmati, which you can find at specialty and health food stores.
I'm sure it's not very authentic, but I really like the flavors in this dish. I don't make it often since my two youngest don't enjoy this taste, but I try to make it periodically because the rest of us just love it.